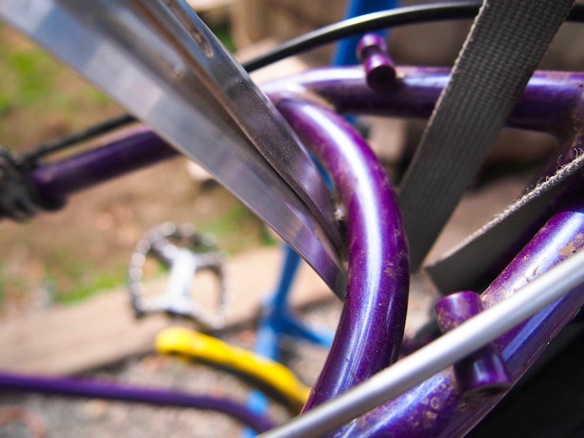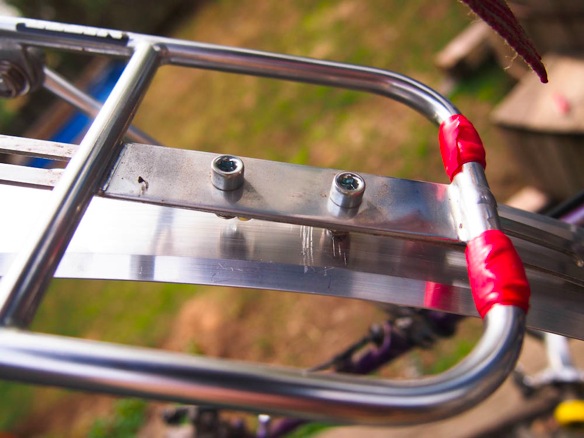
In an afternoon, some donated corruplast signage from Bike wRider, fender hardware spanning several decades from Off The Chain bike co-op in Anchorage, and several dollars of aluminum door threshold sourced from the hardware store become a fatbike fender. The whole thing was assembled with a Crank Brothers multitool, some standard M5 nuts and bolts, and the leather punch on a Swiss-Army knife. The aluminum threshold material is extremely lightweight and bends easily, while retaining enough rigidity in use. The corruplast has proven its durability all summer, despite a variety of abuse. It is best to align the corruplast “with the grain”, as it will bend and crimp in the opposite direction. The modified Nitto M18 rack is integrated into the design, and the steel tang shown below was eventually removed as the aluminum fender rib served the same purpose. I did not expect the fenders to last through the entire summer, but they show no signs of letting up. Eventually, I made a front mudflap from duct tape and reflective ribbon, and the rear mudflap was sourced from a broken Planet Bike fender. DIY fatbike fenders– Take America Back!
First, bend the aluminum and locate the holes. Drill, and install to the frame. It is nice that the Surly Pugsley has proper threaded fender mounts on the inside of the seatstay and chainstay bridges, despite few commercially available fenders in this size.


At first, the flat steel rack mount was used, but was later removed as it was redundant.

Locate the holes to bolt the rack to the frame of the fender. The Nitto rack is made of tubular Cro-Mo, while the struts are solid aluminum with steel hardware. I removed the backstop support of the rack, simply by bending and breaking it The sharp fragments of brass filler are covered by the red electrical tape. In the future I might do all of this differently, although with the knowledge that it has lasted all summer I cannot complain. This was my final project before leaving Anchorage this spring. While a but crude, I wasn’t going to let the planning phase encroach on the ride.

Clearance is a little tight with the modern top-pull front derailleur. A little bending will do.

In addition to the Nitto Rack stays, a chromed steel fender stay from an old ballon-tire bike was used. Made of low-grade steel, it was easy to widen and bend to shape.

After installing the aluminum and mounting all the bolts, I removed all the parts and reinstalled with the corruplast. There is excessive clearance for the 60mm tire, but the design is intended to fit a full-sized fat tire.

A Carradice saddlebag typically mounts to the seatpost, but with a bag support I find I can fit several drybags between the the bag and the seatpost. Aside from extra capacity, this method reduces swaying common with saddlebags, and provides some cushion to my MacBook which is stored vertically in the Carradice Camper. A basic nylon gear strap holds thing in place.

Ideally, the corruplast is used in the other direction, “with the grain”. It does work in this orientation, but it tends to bend into a ridged shape like corrugated cardboard.

This direction gives a clean bend and holds a nice shape.

60mm Schwalbe Big Apple tires on 65mm rims roll well on pavement, allowing a handful of hundred mile days. On dirt and gravel roads, traction is a bit scant. I might select something with a little more tread next time, even if only the Schwalbe Fat Frank tire. For a more aggressive tread in this tire size, there is the Maxxis Holy Roller 2.4″, Kenda K-Rad 2.5″ and the Kenda Slant Six 2.5″. There are other options with considerably more aggressive tread patterns for downhill use, but they also approach the weight of a proper 4″ fat tire. The Big Apple is a little lighter than the smooth Black Floyd tires available from Surly, and as I expected, are quite durable and puncture-resistant. I didn’t have a single flat from Anchorage all the way to Bozeman, Montana. When I fit fat tires, I sent the Big Apples back to Anchorage where Bike wRider intends to finish them off.


I like a bike with fenders and powerful dynamo lighting. The Pugsley has been my daily transportation for almost a year, and these features make it comfortable and safe in all conditions. I have little time on the Pusgley without the fender, except in a frozen Alaskan winter when it is unnecessary, but one of Joe’s considerations after touring on the Pugsley in the summer of 2010 was that a fender would combat the “unusual amount of spray in the wet”. I still experience some overspray onto my feet while riding fast in extremely wet conditions, such as on pavement. Overall, I remain clean and dry.

The Take America Back slogan was part of Joe Miller’s unsuccessful bid for Senate in 2010. He was a vocal Tea Party candidate, but lost to Republican incumbent Lisa Murkowski, a write-in candidate in the race.

You mention dynamo lighting, can you talk a little about what sort of dynamo setup you have on the pugs?
Kevin, I have used Shimano dynamo hubs on two bikes. On the High Sierra, I used a Shimano 3N72 for almost two years, and many thousand miles. On the Pugs, I have the 3D80 (for centerlock disc) and have used it all summer. I tend to leave the light on all the time. Both hubs have been submerged in water, have frozen, and have never required any maintenance to bearings or electronic internals. Resistance is negligible. I have not considered the SON hubs, largely due to the cost.
The current headlight is a Supernova E3, the glare-free model designed to focus the beam toward the road (as opposed to symmetrical beams, like a flashlight). The aluminum housing and multi-mount is rugged and inspires confidence. The beam is great for commuting and dark roads and paths. It seems to be a little blinding on bike paths, but not as bad as some high-end symmetrical beam battery lights, such as the Nite Riders, etc. On tight curves at night, such as on tight singletrack, I have a hard time seeing around corners. There is a more expensive model, the Supernova E3 Triple, that would help in these situations, although it would be less appropriate in town. Adding a battery headlamp helps.
On my last bike, I used the B&M IQ CYO, which was a great value and produced a competitive beam to the E3, but was encased in a plastic housing. Eventually, the plastic mounting tab broke, although it might have been due to overtightening. I glued it, and it eventually broke again. The E3 solves this issue for me.
The taillight on both bikes is a B&M Toplight Line Plus, from Peter White Cycles. The light output is very good, and makes efficient use of only two LEDs. However, after much dirt road riding and trails, both lights have eventually lost the “standlight” capacity, which is based upon a capacitor that has come loose inside the housing. The housing is plastic, and does not indicate that it was meant to be serviced. I cracked open the last one I had and soldered the capacitor back into place, and glued the housing shut.
Thanks for the thorough reply!
I just fashioned a couple fatty fenders, myself. I used basically the same technique with the plastic cardboard. I didn’t use any reinforcing metal strip, though. I achieved the curve by inserting bent stiff wire through the linear holes in the board (a deconstructed wire clothes hanger). The front fender seems sturdy, but I think I may need to add some sort of reinforcement to keep it in place. I think it also may need to be a bit longer.
While on my DIY kick, I decided to take a stab at fork cages, too. Here is a brief rundown of what I did: https://plus.google.com/u/0/109265317571112171847/posts/fpSo5Q7A5J6
Looks great as well! I have more than enough space for now, especially with the Carradice Camper. I have specifically avoided the AC on the fork in the past as I knew it was not up to the task. This looks infinitely more durable. Looks like you have borrowed from the King Cage design.
Looks brilliant! I think I’m going to make some! What exactly did you use?
The plastic material is an old political sign I swiped from a neighbor’s front lawn. =) The metal is some 1″ aluminum bar I picked up at the hardware store. If I were to repeat, I would try to find a sturdier metal. I recently did the White Rim Trail unsupported and carried a 3-litre bottle of water on each side of my fork. That much weight, it bent the little shelf part down a bit.
I’ve tossed around the idea going ahead and buying the new model of Anything Cages since they seem pretty solid these days. I just haven’t pulled the trigger yet.
Good luck!
Hey Sean, These look like a great start! I used a Nitto mini-rack in the rear as a saddlebag support which I considered essential to the rigidity of the rear fender, which also supported a dynamo light. Looks like you are doing the same with the Bagman support Keep your eyes open for fender hardware from 26″ ATB fenders or 700c touring bikes to fashion some struts as the fenders get longer.
I was initially skeptical of the durability of my creation, especially as they were fabricated at the final hour, but they held up to all kind of abuse over an entire year or touring and trail riding.
nicholas